In this lesson we will:
- examine screen properties;
- explore layout parameters (height, width, margin, gravity, weight)
Screens
To begin with, here is some theory about screens. A screen has such physical properties as size and resolution. Screen size - a distance between two opposite corners of the screens, usually measured in inches. Resolution - a number of points horizontally and vertically, which the screen is able to display, measured in pixels.
Let’s take a display of HTC Desire smartphone as an example. Screen size = 3.7 inches, resolution = 800x480 pixels.
The number of pixels in one inch is called dpi (dots per inch). Let’s find out what is dpi equal to in this case. Remembering the basics: c2 = a2 + b2, where c is a number of pixels on the diagonal. c is a number of pixels that fits into 3.7 inches. a and b are the sides of the screen.
c = 3,7 * dpi
(3,7 * dpi)2 = 4802 + 8002dpi2 = 870400 / 13,69 = 63579
dpi = 252. So into one inch of the screen fits the number of pixels which is equal to 252.
Let’s get back to the lesson subject. Let’s look through in detail the following parameters of View elements
Layout width and Layout height
We have talked a little about width (layout_width) and height (layout_height) in the previous lesson. We can specify absolute values for them or we can use constants. Let’s explore these possibilities.
ABSOLUTE VALUES:
dp or dip - Density-independent Pixels. Abstract unit of measure, that allows applications to look alike on different screens and resolutions.
sp - Scale-independent Pixels. The same as dp, but is used for font sizes in View-elements.
pt - 1/72 of an inch, is defined by the physical screen size. This MU if from
typoghraphy.
px - pixel, not recommended to use, as the application will look different on different screens.
mm - a millimeter, defined by the physical size of the screen.
in - an inch, defined by the physical size of the screen.
CONSTANTS
match_parent (fill_parent) - means that the element will occupy all the available width/height in the parent element.
wrap_content - width/height is defined by its content
Let’s create a project:
Project name: P0072_LayoutProp
Build Target: Android 2.3.3
Application name: LayoutProp
Package name: ru.startandroid.develop.layoutprop
Create Activity: MainActivity
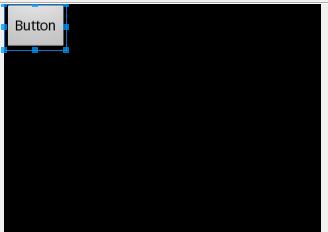
Open main.xml. Configure root LinearLayout to have horizontal orientation. Delete the TextView and add a Button with width and height equal to wrap_content. It is now displayed on the screen and its width corresponds to the text width in it.
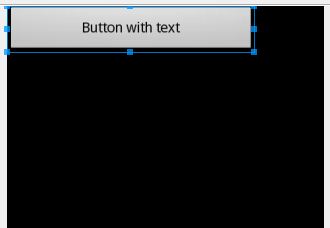
Change text "Button" to "Button with text", save and have a look at the screen.
The button became wider, as the width is defined by the content. If we now specify the width of 250 dp, the button will stretch independently of content.
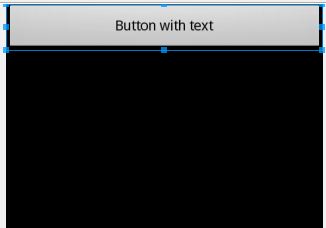
Now make the width equal to match_parent. The button has stretched for the whole parent width (LinearLayout). And LinearLayout by-turn occupies the whole screen width.
If our parent contains a few elements and we want them to occupy the whole space, we must use Layout weight parameter. Free space is distributed proportionally to element weight values.
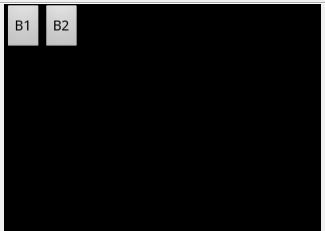
Change text of our button to B1 and add it a neighbour in LinearLayout - the second button with B2 text. Set the wrap_content width for both
Let’s start dividing. If we want the space of the parent to be distributed equally - specify weight = 1 for both. In this case buttons will have equal widths.
Note that simple numbers are specified, not units of measure.
If you need B1 to occupy a quarter and B2 three quarters of the available space, then specify weight = 1 for B1 and weight = 3 for B2.
There can be any number of elements. Add also a button with text B3, weight = 2 and width = wrap_content
xml-code of the resulted screen:
<?xml version="1.0" encoding="utf-8"?>
<LinearLayout
xmlns:android="http://schemas.android.com/apk/res/android"
android:layout_width="fill_parent"
android:layout_height="fill_parent"
android:orientation="horizontal">
<Button
android:id="@+id/button1"
android:layout_height="wrap_content"
android:layout_width="wrap_content"
android:text="B1"
android:layout_weight="1">
</Button>
<Button
android:id="@+id/button2"
android:layout_width="wrap_content"
android:layout_height="wrap_content"
android:text="B2"
android:layout_weight="3">
</Button>
<Button
android:layout_height="wrap_content"
android:layout_width="wrap_content"
android:id="@+id/button3"
android:text="B3"
android:layout_weight="2">
</Button>
</LinearLayout>
Now specify weight = 0 for B2 and B3. They don’t have a claim on the free space now and have a width defined by the content, so B1 occupies all the space
It is obvious this can be also applied to the height parameter.
When using weight attribute you can specify the value of height or width = 0dp. In this case the content of the element would be ignored and the result will more correspond to weight ratios.
Layout gravity
layout_gravity parameter is similar to alignment in Word or Excel. It would be the most convenient to demonstrate it using FrameLayout. I didn’t describe this layout in the previous lesson as it is very simple. All the elements put in it, are by default positioned in the top left corner and are not lined up in any way. It fits great for demonstrating alignment settings.
Create grlayout.xml:
<?xml version="1.0" encoding="utf-8"?>
<LinearLayout
xmlns:android="http://schemas.android.com/apk/res/android"
android:orientation="vertical"
android:layout_width="match_parent"
android:layout_height="match_parent">
<FrameLayout
android:id="@+id/frameLayout1"
android:layout_width="match_parent"
android:layout_height="match_parent">
<Button
android:id="@+id/button1"
android:layout_width="wrap_content"
android:layout_height="wrap_content"
android:layout_gravity="top|left"
android:text="gravity = top left">
</Button>
<Button
android:id="@+id/button2"
android:layout_width="wrap_content"
android:layout_height="wrap_content"
android:layout_gravity="top|right"
android:text="gravity = top right">
</Button>
<Button
android:id="@+id/button3"
android:layout_width="wrap_content"
android:layout_height="wrap_content"
android:layout_gravity="bottom|left"
android:text="gravity = bottom left">
</Button>
<Button
android:id="@+id/button4"
android:layout_width="wrap_content"
android:layout_height="wrap_content"
android:layout_gravity="bottom|right"
android:text="gravity = bottom right">
</Button>
<Button
android:id="@+id/button5"
android:layout_width="wrap_content"
android:layout_height="wrap_content"
android:layout_gravity="center"
android:text="gravity = center">
</Button>
</FrameLayout>
</LinearLayout>
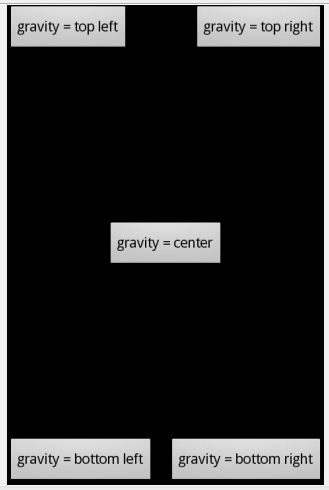
On the screen:
For clarity text on the button displays its properties. Everything is clear and simple.
I honestly tried to understand what are gravity values fill_* and clip_* for, but I couldn’t. What is written in help about them, doesn’t work for me. If you have any information regarding this - write a comment.
Layout margin
margin parameters are completely similar to html margin. Margin can be on all the sides at once or only on the sides, where it is required. Let’s demonstrate it with a TableLayout example. We will create marginlayout.xml and draw a table three by three with buttons
<?xml version="1.0" encoding="utf-8"?>
<LinearLayout
xmlns:android="http://schemas.android.com/apk/res/android"
android:orientation="vertical"
android:layout_width="match_parent"
android:layout_height="match_parent">
<TableLayout
android:layout_height="wrap_content"
android:layout_width="match_parent"
android:id="@+id/tableLayout1">
<TableRow
android:id="@+id/tableRow1"
android:layout_width="wrap_content"
android:layout_height="wrap_content">
<Button
android:text="Button"
android:id="@+id/button1"
android:layout_width="wrap_content"
android:layout_height="wrap_content">
</Button>
<Button
android:text="Button"
android:id="@+id/button2"
android:layout_width="wrap_content"
android:layout_height="wrap_content">
</Button>
<Button
android:text="Button"
android:id="@+id/button3"
android:layout_width="wrap_content"
android:layout_height="wrap_content">
</Button>
</TableRow>
<TableRow
android:id="@+id/tableRow2"
android:layout_width="wrap_content"
android:layout_height="wrap_content">
<Button
android:text="Button"
android:id="@+id/button4"
android:layout_width="wrap_content"
android:layout_height="wrap_content">
</Button>
<Button
android:text="Margin"
android:id="@+id/button5"
android:layout_width="wrap_content"
android:layout_height="wrap_content">
</Button>
<Button
android:text="Button"
android:id="@+id/button6"
android:layout_width="wrap_content"
android:layout_height="wrap_content">
</Button>
</TableRow>
<TableRow
android:id="@+id/tableRow3"
android:layout_width="wrap_content"
android:layout_height="wrap_content">
<Button
android:text="Button"
android:id="@+id/button7"
android:layout_width="wrap_content"
android:layout_height="wrap_content">
</Button>
<Button
android:text="Button"
android:id="@+id/button8"
android:layout_width="wrap_content"
android:layout_height="wrap_content">
</Button>
<Button
android:text="Button"
android:id="@+id/button9"
android:layout_width="wrap_content"
android:layout_height="wrap_content">
</Button>
</TableRow>
</TableLayout>
</LinearLayout>
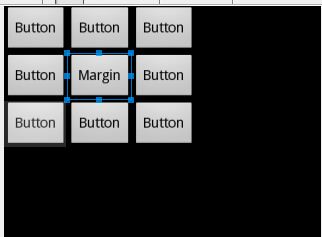
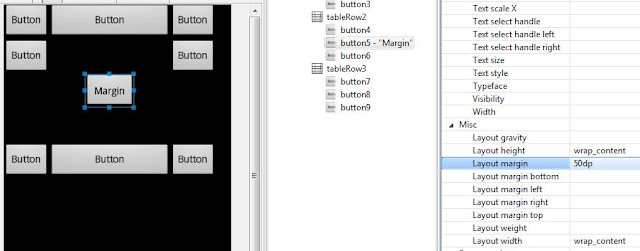
We will experiment with the button in the middle.
margin = 50 dp
And a margin = 50 dp appears around the button
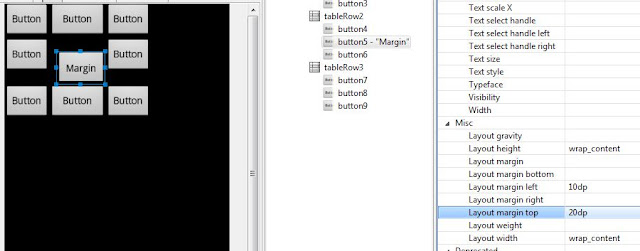
margin left = 10 dp
margin top = 20 dp
Top and left margins.
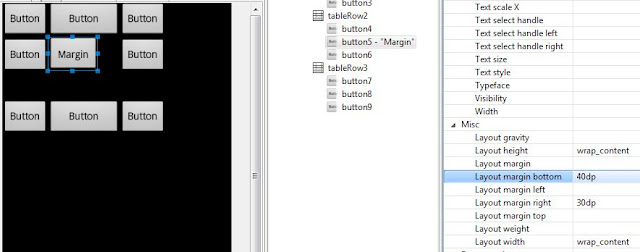
margin right = 30 dp
margin bottom = 40 dp
Right and bottom margins
The lesson appears to be quite big, but valuable. I guess it is the last lesson of design, modelling and making-up and we will start coding.